Using bidirectional bridge

I successfully used this bridge in the course material
ros2 run the bridge parameter bridge /cmd_vel@geometry_msgs/msg/Twist@ignition.msgs.Twist

I would like to use it on my own robot. I have successfully spawned my robot model in Gazebo SIM. I changed your message to ros2 run ros_gz_bridge parameter_bridge /cmd_vel@geometry_msgs/msg/Twist@gz.msgs.Twist (removed ignition and replaced with gz) I received a message of file not executable.

This seems to be the reference i need to use Use ROS 2 to interact with Gazebo — Gazebo ionic documentation

But, I don’t understand, as it does not seem to match what is the class reference. Can you help provide an explanation Thank you

Hi @ROxX ,

Here is the proper steps in case you are not doing it correctly:

  1. Start the robot state publisher :- without this you cannot spawn your robot.
  2. Spawn your robot :- without spawning the robot in the simulation, you can’t see it.
  3. Start the ROS-GZ bridge :- without starting the bridge, you won’t be able to move the robot.

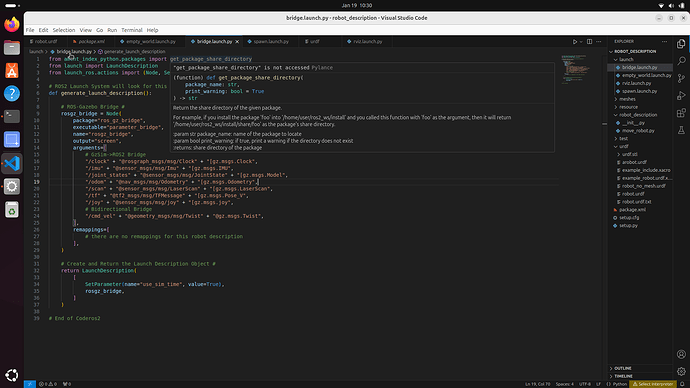
Here is the ROS-GZ bridge node that you need to add to your launch file of spawn.launch.py or rosgz_bridge.launch.py:

from ament_index_python.packages import get_package_share_directory
from launch import LaunchDescription
from launch_ros.actions import (Node, SetParameter)

# ROS2 Launch System will look for this function definition #
def generate_launch_description():

    # ROS-Gazebo Bridge #
    rosgz_bridge = Node(
        package="ros_gz_bridge",
        executable="parameter_bridge",
        name="rosgz_bridge",
        output="screen",
        arguments=[
            # GzSim->ROS2 Bridge
            "/clock" + "@rosgraph_msgs/msg/Clock" + "[gz.msgs.Clock",
            "/imu" + "@sensor_msgs/msg/Imu" + "[gz.msgs.IMU",
            "/joint_states" + "@sensor_msgs/msg/JointState" + "[gz.msgs.Model",
            "/odom" + "@nav_msgs/msg/Odometry" + "[gz.msgs.Odometry",
            "/scan" + "@sensor_msgs/msg/LaserScan" + "[gz.msgs.LaserScan",
            "/tf" + "@tf2_msgs/msg/TFMessage" + "[gz.msgs.Pose_V",
            # Bidirectional Bridge
            "/cmd_vel" + "@geometry_msgs/msg/Twist" + "@gz.msgs.Twist",
        ],
        remappings=[
            # there are no remappings for this robot description
        ],
    )

    # Create and Return the Launch Description Object #
    return LaunchDescription(
        [
            SetParameter(name="use_sim_time", value=True),
            rosgz_bridge,
        ]
    )

# End of Code

This should definitely work for any mobile robot that uses /cmd_vel topic for movements.

Try this and let me know if it worked for you. It works for me because I have been using this for several of my projects. So, if this does not work for you, then you have made a fundamental mistake somewhere in your project, most likely in your robot description files. If that’s the case, then please post your Robot URDF file completely along with the launch file(s) which you use to publish the robot state publisher, ros-gz bridge and spawn.

Regards,
Girish

Thank you for a very useful launch code, I will be able to use it for the rest of my project. However, I still have some error that prevents the robot from moving. The robot is just four mecanum wheels and a frame, once I have this working I will add lidar, camera, and the gripper linkage. Once I understand what errors I have, I will add the other components.

I have been following the commands on this reference https://gazebosim.org/docs/ionic/spawn_urdf/
terminal 1 gz sim empty.sdf
terminal 2 gz service -s /world/empty/create --reqtype gz.msgs.EntityFactory --reptype gz.msgs.Boolean --timeout 1000 --req ‘sdf_filename: “/path/to/model.urdf”, name: “urdf_model”’
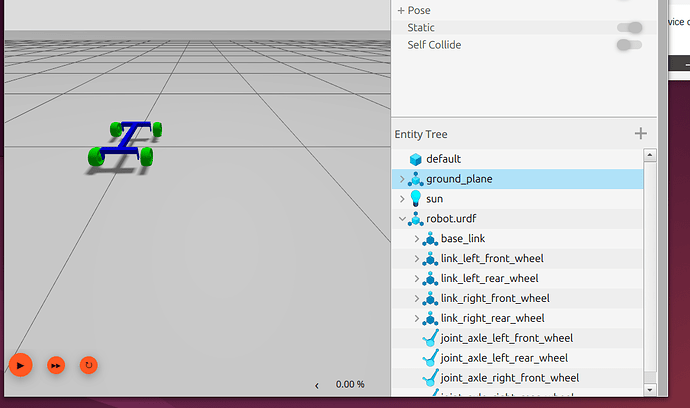
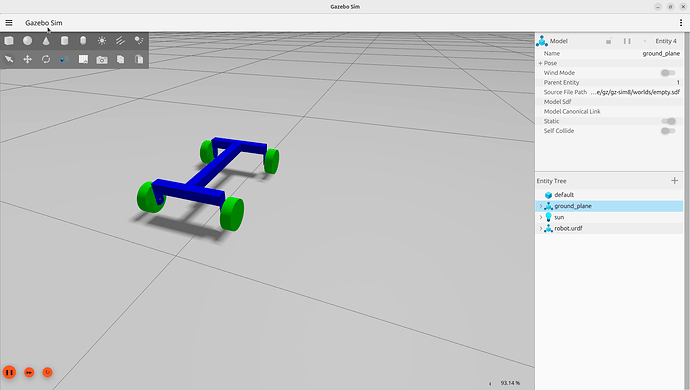
for ref filename “/home/tmd/ros2_ws/src/robot_description/urdf/robot.urdf”, name=robot.urdf - works as shown in pic

**** after these two commands, I have the robot on the display screen
terminal 3 launched your code, witch has no errors
terminal 4 ros2 run teleop_twist_keyboard telelop_twist_keyboard — which creates the keyboard - but the robot does not move

The urdf file does not have friction on wheels, but did not think that mattered.

Eventually, I would like to get the move_robot.py file to work, but that is not my first priority, just getting the teleop will get me started.

Thank you for the review

Tom

(Attachment robot.urdf is missing)

(Attachment setup.py is missing)

(Attachment move_robot.py is missing)

I received an error on the first time I sent this, so hope this is not
a duplicate.

Thank you for a very useful launch code, I will be able to use it for
the rest of my project. However, I still have some error that
prevents the robot from moving. The robot is just four mecanum wheels
and a frame, once I have this working I will add lidar, camera, and
the gripper linkage. Once I understand what errors I have, I will add
the other components.

I have been following the commands on this reference
https://gazebosim.org/docs/ionic/spawn_urdf/
terminal 1 gz sim empty.sdf
terminal 2 gz service -s /world/empty/create --reqtype
gz.msgs.EntityFactory --reptype gz.msgs.Boolean --timeout 1000 --req
‘sdf_filename: “/path/to/model.urdf”, name: “urdf_model”’
for ref filename
“/home/tmd/ros2_ws/src/robot_description/urdf/robot.urdf”,
name=robot.urdf - works as shown in pic
**** after these two commands, I have the robot on the display screen
terminal 3 launched your code, witch has no errors
terminal 4 ros2 run teleop_twist_keyboard telelop_twist_keyboard
— which creates the keyboard - but the robot does not move

The urdf file does not have friction on wheels, but did not think that mattered.

Eventually, I would like to get the move_robot.py file to work, but
that is not my first priority, just getting the teleop will get me
started.

Thank you for the review

Tom

--------------------------- the urdf code ---------

<?xml version="1.0"?>

#include

joint_axle_left_front_wheel joint_axle_right_front_wheel joint_axle_left_rear_wheel joint_axle_right_rear_wheel 0.292 0.220 0.038 50Hz
(attachments)

Hi @ROxX ,

Then I am pretty sure that your robot description file has issues.

I did not receive any of the three files that you have attached.

If you don’t have issues posting them publicly here, then you can post all the 3 file contents here, each within “preformatted text” block (also known as markdown code-block).

If you don’t want to share your files publicly, then send it to my email id directly. My email id is my username as it is, followed by @gmail.com. For obvious online security reasons, I am not sharing my email id directly here.

I can then check your files and provide you feedback as to what is causing you the issues!

Regards,
Girish

Hi @ROxX ,

I saw your files that you sent over to my email. I could not see them on simulation because you did not send me the .stl files. So the robot will load up blank in Gazebo Sim.

I did go through your files and found some issues:

  1. Your URDF file:
    i. Remove the #include. XML files are not C++ files!
    ii. Remove the spaces in <wheelbase> 0.292 </wheelbase>.
    iii. Remove the Hz from <odom_publish_frequency>50Hz</odom_publish_frequency>.
    iv. You must configure the Mecanum Drive topics properly for Teleop to work. Correctly define <topic>, <odom_topic>, <tf_topic>, <frame_id>, <child_frame_id>. Default values WILL NOT WORK with teleop.
    v. You have a lot of typo errors and basic mistakes all over your URDF file. Please correct them properly. Otherwise, whatever you do, your robot will never move!
<?xml version="1.0"?>

#include   <--- what is this line for? remove it!

<robot name="robot">

    <link name="base_link">
        <origin rpy="0 0 0" xyz="0 0 0"/>
    </link>
    
    <joint name="base_to_axle" type="fixed">
        <parent link="base_link"/>
        <child link= "axle_frame"/>
        <origin xyz="0 0 0.1" rpy="0 0 0"/>
    </joint>
    
    <link name="axle_frame">
        <inertial>
            <mass value="10"/>
            <origin xyz="0 0 0" rpy="0 1.57 1.57"/>
            <inertia ixx="1.5417"  ixy="0" ixz="0" iyy="3.467" iyz="0" izz="4.742"/>
        </inertial>

        <collision>
                <origin xyz="0 0 0" rpy="1.57 0 1.57 "/>
                <geometry>
                    <mesh filename= "/home/tmd/ros2_ws/src/robot_description/meshes/axle_frame_dec.stl"/>
                </geometry>
        </collision>

        <visual>
            <origin xyz="0 0 0" rpy="1.57 0 1.57 "/>
            <geometry>
                <mesh filename= "/home/tmd/ros2_ws/src/robot_description/meshes/axle_frame_dec.stl"/>
            </geometry>
            <material name="Blue">
                 <color rgba="0 0 1 1"/>
            </material>

        </visual>

    </link>    

    <joint name="joint_axle_left_rear_wheel" type="continuous">
        <origin rpy="0 0 0" xyz="-0.146 0.110 -0.05" />
        <child link="link_left_rear_wheel" />
        <parent link="axle_frame" />
        <axis rpy="0 0 0" xyz="0 1 0" />
        <limit effort="10000" velocity="1000" />
        <joint_properties damping="1.0" friction="1.0" />
    </joint>

    <joint name="joint_axle_right_rear_wheel" type="continuous">
        <origin rpy="0 0 0" xyz="-0.146 -0.110 -0.05" />
        <child link="link_right_rear_wheel" />
        <parent link="axle_frame" />
        <axis rpy="0 0 0" xyz="0 1 0" />
        <limit effort="10000" velocity="1000" />
        <joint_properties damping="1.0" friction="1.0" />
    </joint>

    <joint name="joint_axle_left_front_wheel" type="continuous">
        <origin rpy="0 0 0" xyz="0.146 0.110 -0.05" />
        <child link="link_left_front_wheel" />
        <parent link="axle_frame" />
        <axis rpy="0 0 0" xyz="0 1 0" />
        <limit effort="10000" velocity="1000" />
        <joint_properties damping="1.0" friction="1.0" />
    </joint>

    <joint name="joint_axle_right_front_wheel" type="continuous">
        <origin rpy="0 0 0" xyz="0.146 -0.110 -0.05" />
        <child link="link_right_front_wheel" />
        <parent link="axle_frame" />
        <axis rpy="0 0 0" xyz="0 1 0" />
        <limit effort="10000" velocity="1000" />
        <joint_properties damping="1.0" friction="1.0" />
    </joint>

    <link name="link_left_rear_wheel">
        <inertial>
            <mass value="0.16" />
            <origin xyz="0 0 0" rpy="0 0 1.57" />
            <inertia ixx="0.00010" ixy="0" ixz="0" iyy=".00010" iyz="0" izz=".0000416"/>
        </inertial>
        <collision>
            <origin rpy="0 0 1.57" xyz="0 0 0" />
            <geometry>
                 <mesh filename= "/home/tmd/ros2_ws/src/robot_description/meshes/wheel_dec.stl"/>
            </geometry>
        </collision>
        <visual>
            <origin rpy="0 0 1.57" xyz="0 0.03 0" />
            <geometry>
                <mesh filename= "/home/tmd/ros2_ws/src/robot_description/meshes/wheel_dec.stl"/>
            </geometry>
            <material name="Green">
                 <color rgba="0 1 0 1"/>
            </material>
        </visual>
    </link>

    <link name="link_right_rear_wheel">
        <inertial>
            <mass value="0.16" />
            <origin xyz="0 0 0" rpy="0 0 1.57" />
            <inertia ixx="0.00010" ixy="0" ixz="0" iyy=".00010" iyz="0" izz=".0000416"/>
        </inertial>
        <collision>
            <origin rpy="0 0 1.57" xyz="0 0 0" />
            <geometry>
                 <mesh filename= "/home/tmd/ros2_ws/src/robot_description/meshes/wheel_dec.stl"/>
            </geometry>
        </collision>
        <visual>
            <origin rpy="0 0 1.57" xyz="0 0 0" />
            <geometry>
                <mesh filename= "/home/tmd/ros2_ws/src/robot_description/meshes/wheel_dec.stl"/>
            </geometry>
            <material name="Green">
                 <color rgba="0 1 0 1"/>
            </material>
        </visual>
    </link>

   <link name="link_left_front_wheel">
        <inertial>
            <mass value="0.16" />
            <origin xyz="0 0 0" rpy="0 0 -1.57" />
            <inertia ixx="0.00010" ixy="0" ixz="0" iyy=".00010" iyz="0" izz=".0000416"/>
        </inertial>
        <collision>
            <origin rpy="0 0 -1.57" xyz="0 0 0" />
            <geometry>
                 <mesh filename= "/home/tmd/ros2_ws/src/robot_description/meshes/wheel_dec.stl"/>
            </geometry>
        </collision>
        <visual>
            <origin rpy="0 0 -1.57" xyz="0 0 0"/>
            <geometry>
                 <mesh filename= "/home/tmd/ros2_ws/src/robot_description/meshes/wheel_dec.stl"/>
            </geometry>
            <material name="Green">
                 <color rgba="0 1 0 1"/>
            </material>
        </visual>
    </link>

    <link name="link_right_front_wheel">
        <inertial>
            <mass value="0.16" />
            <origin xyz="0 0 0" rpy="0 0 1.57" />
            <inertia ixx="0.00010" ixy="0" ixz="0" iyy=".00010" iyz="0" izz=".0000416"/>
        </inertial>
        <collision>
            <origin rpy="0 0 1.57" xyz="0 0 0" />
            <geometry>
                 <mesh filename= "/home/tmd/ros2_ws/src/robot_description/meshes/wheel_dec.stl"/>
            </geometry>
        </collision>
        <visual>
            <origin rpy="0 0 1.57" xyz="0 0 0" />
            <geometry>
                <mesh filename= "/home/tmd/ros2_ws/src/robot_description/meshes/wheel_dec.stl"/>
            </geometry>
            <material name="Green">
                 <color rgba="0 1 0 1"/>
            </material>
        </visual>
    </link>

    <gazebo>
         <plugin filename="gz-sim-mecanum-drive-system"  name="gz::sim::systems::MecanumDrive">
      <!--  <plugin name="mecanum_drive_plugin"  filename=libmecanum_drive_plugin.so> -->
            <front_left_joint>joint_axle_left_front_wheel</front_left_joint>
            <front_right_joint>joint_axle_right_front_wheel</front_right_joint>     
            <back_left_joint>joint_axle_left_rear_wheel</back_left_joint>     
            <back_right_joint>joint_axle_right_rear_wheel</back_right_joint> 
            <wheelbase>  0.292 </wheelbase>    <--- you can't have irregular spaces, delete them!
            <wheel_separation>0.220</wheel_separation>
            <wheel_radius>0.038</wheel_radius>
            <odom_publish_frequency>50Hz</odom_publish_frequency>   <--- you can't have Hz here, just use 50 (without Hz)

            You need to set the below topics properly, this is why you are unable to move your robot.
            Your Mecanum Drive plugin is completely incorrectly configured with lot of mistakes!

            <!--
            <topic>: Custom topic that this system will subscribe to in order to receive command velocity messages. This element if optional, and the default value is /model/{name_of_model}/cmd_vel.
            <odom_topic>: Custom topic on which this system will publish odometry messages. This element if optional, and the default value is /model/{name_of_model}/odometry.
            <tf_topic>: Custom topic on which this system will publish the transform from frame_id to child_frame_id. This element if optional, and the default value is /model/{name_of_model}/tf.
            <frame_id>: Custom frame_id field that this system will use as the origin of the odometry transform in both the <tf_topic> gz.msgs.Pose_V message and the <odom_topic> gz.msgs.Odometry message. This element if optional, and the default value is {name_of_model}/odom.
            <child_frame_id>: Custom child_frame_id that this system will use as the target of the odometry trasnform in both the <tf_topic> gz.msgs.Pose_V message and the <odom_topic> gz.msgs.Odometry message. This element if optional, and the default value is {name_of_model}/{name_of_link}.
            -->
        </plugin>
    </gazebo>

</robot>
  1. Your setup.py file.
    I don’t find any issues here. Since you have not shared the move_robot.py file with me, I can’t say if your python program has any issues.
    • To use all the files with a folder, for example, from meshes folder, you can specify the glob pattern as glob('meshes/**)).
import os
from glob import glob
from setuptools import find_packages, setup

package_name = 'robot_description'

setup(
    name=package_name,
    version='0.0.0',
    packages=find_packages(exclude=['test']),
    data_files=[
        ('share/ament_index/resource_index/packages',
            ['resource/' + package_name]),
        ('share/' + package_name, ['package.xml']),
        (os.path.join('share', package_name, 'urdf'), glob('urdf/*.urdf')),
        (os.path.join('share', package_name, 'rviz'), glob('rviz/*.rviz') ),
        (os.path.join('share', package_name, 'meshes'), glob('meshes/*.stl')),
        (os.path.join('share', package_name, 'launch'), glob('launch/*.launch.*')),
    ],
    install_requires=['setuptools'],
    zip_safe=True,
    maintainer='tmd',
    maintainer_email='tmd@todo.todo',
    description='TODO: Package description',
    license='TODO: License declaration',
    tests_require=['pytest'],
    entry_points={
        'console_scripts': [
            'robot_description = robot_description.move_robot:main',
        ],
    },
)

In summary, just like I suspected, your URDF file was configured quite bad and you need to fix it. I am surprised to see that your robot spawned correctly on Gazebo Sim. You should use a launch file to spawn your robot instead of using Gazebo Sim’s command line spawn service call.

I suggest (and highly recommend) that you take the URDF with ROS2 course, to learn how to properly write a URDF / xacro file!

Regards,
Girish

Thank you for your review, I greatly appreciate it. The Construct on-line classes are the best I have found, and your code review greatly enhances the course. I will work to resolve everything you identified over the next couple of days.

Regards

Tom

Hi @ROxX ,

You’re welcome! Glad to help a fellow robotics learner!

Yes, I would like to hear you say that everything worked fine, because you have been working on this for quite a few days… and I don’t want to see you give up!

Cheers,
Girish

Thank you for all your support. I successfully was able to make the robot move using the keyboard. I reviewed and fixed the errors you found in my code. Also, added the surface friction code and replaced the plugin wheels with simple cylinder modifications. I modified the speeds using the keyboard settings and the robot is controllable, within the limits of the keyboard. So success.

I have used a video game controller to move turtlebot in the older version of Gazebo, and would like to be able to do that with this model. .

I modified the bridge code, (see attached) and it runs without error. I activated ros2 run joy joy_node, and was able to confirm the joy data with ros2 topic echo/joy. The echo data is the same as I have seen when running the controller and turtlebot. However, the robot does not respond to the joy data.

Any suggestions on what I am missing to make the game controller work?

(attachments)


Hi @ROxX ,

You’re welcome! I am glad to hear this news from you! Awesome news!

I have used a PS2 joystick (with a USB converter) with the old Gazebo (classic version) but I have never tried interfacing any game controller with the new Gazebo (modern version).
Since you said that you are able to get the joystick data on the /joy node, I am sure that there is not communication between ROS2 and Gazebo Sim for the joystick data.
I see that you have defined a unidirectional bridge for /joy topic, from ROS2 to Gazebo Sim, but I guess it requires more configuration.
I think you need to run a Keypress publisher to communicate the joystick values to Gazebo Sim. This page shows how it is done for keyboard, but replicate the procedure for joystick.
Link: Moving the robot — Gazebo harmonic documentation
I believe the reason why the joystick is not working in your case, even after configuring the ROS2 to Gazebo Sim bridge is that, the button values of the joystick are not properly mapped to Gazebo Sim functionality. Thus the joystick is not able to communicate properly between ROS2 and Gazebo Sim. Implement the Keypress publisher properly and you should have your joystick working!

Let me know if you got it working!

Regards,
Girish

Thanks to your efforts, I am beginning to understand the plugin behaviors. So, a new question. As you stated the problem is joystick data is not being transmitted to the robot.

The keyboard plugin is designed for a single key that sends data from 16777235 to . It will work fine. There are good examples on how to use the TriggerPublisher plugin, but I don’t think it will work for my needs


16777235


linear: {x: 0.5}, angular: {z: 0.0}

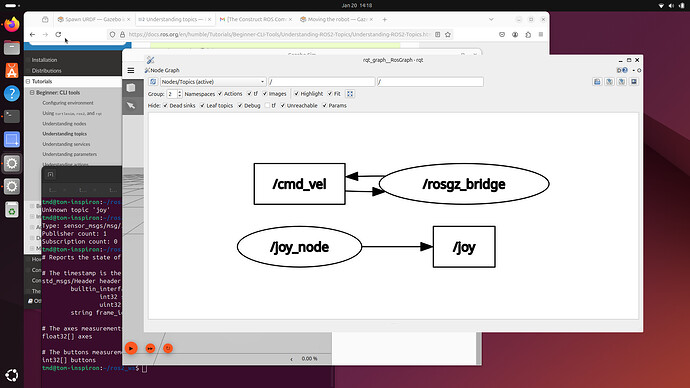
A joystick sends a range of values, which we want to utilize. The rqt_graph clearly shows the problem, The joy node publishes sensor/msgs/msg/joy and the robot needs geometry/msgs/msg/Twist. What is needed is a dedicated plugin that can use a mapping function that take the inputs (joy node data) and outputs.(Twist data) I used ChatGPT to create a concept. Would you or anyone at The Construct like to make a dedicated plugin?

Thanks for all your help.

Tom

(Attachment joy to Twist.pdf is missing)

(attachments)


Hi @ROxX ,

Yes, I realized that this would happen with joysticks. Keyboards produce a single value output whereas a joystick produces a range, especially if the button is a rotary button.

Most probably not, since most of the work done in courses involve the use of keyboard and not all students have a joystick at their immediate disposal.
You could search for some git repositories that have provided this capability.

I would suggest that you create a custom mapping function by yourself. This would be a best option.
Get the maximum and minimum values for all the buttons of all axes in your joystick and map it between 0.0 to 1.0 or 0 to 255. You will need to then map these mapped values to the speed of the robot, from minimum to maximum. So you will do two mappings of values: joystick range to a unified range and unified range to robot speed range.
You can then map the output of the above joystick to the cmd_vel topic in the Gazebo Sim using the bidirectional bridge for cmd_vel topic.
This will of course negate the use of the /joy topic to be communicated with Gazebo Sim, but you can get your robot to move.

Making a plugin for this process would be a whole different story, since one cannot make a plugin just for one joystick. Two joystick outputs may not be the same, if the joystick manufacturers are different. Then there is an issue of making this plugin suitable for “any” joystick and there is no way to test the result without having all the joysticks available in the market. This would be a tedious task for an otherwise simple issue/problem. Therefore, I suggest that you implement the idea that I have mentioned you above, to make things simpler.

Regards,
Girish

I understand the challenges of trying to write a generic mapping function for a plugin. Would take a lot of resources.
I have some friends that are capable of helping me write a custom mapping function. Will discuss with them. In concept I know what needs to be done, but do not have the code writing skills to do it.

Thank you for all your help

Tom